Following are questions that customers often ask us about our embroidery products, and the answers to those questions. If this information does not address your issue, please go to the Other Questions section below.
General Edge-to-Edge Quilting Questions
Can I use your Edge-to-Edge Quilting designs on my embroidery machine?
Well, that depends on two things: whether we support your file type, and whether your machine has a hoop large enough for our files. Supported file types are listed on the product pages and back covers of every one of our embroidery products, and the file sizes are listed there as well.
For convenience, here are the machine and file types. Be aware that some machines support more than one file type:
- Brother, Baby Lock, Bernina — PES files
- Bernina, Melco — EXP files
- Bernina — ART files (see question in Bernina section)
- Husqvarna — HUS files
- Husqvarna Viking Pfaff — VP3 files and VIP files (for older machines)
- Janome — JEF files
- Tajima and many other machines — DST files (DST is somewhat of a “universal” file format – many machines can read)
- Toyota – 10o files
Also for convenience, here are the sizes of the designs for the Edge-to-Edge Quilting book. Note that individual file sizes will vary a bit. The book and design information available with each expansion pack gives the specific size for each file. However, generally all files are no larger than the following:
- Small — 5.6 x 9.9 inches
- Medium — 6.7 x 11.7 inches
- Large — 7.8 x 13.8 inches
How do I get started with Edge-to-Edge Quilting?
If you’re new to your embroidery machine — start by embroidering some of the designs that came on your machine, using inexpensive or scrap fabric. Embroidery is fun, but there are always a few things you need to learn, in order to get good results, and some of those things are specific to specific machines. One important general reminder: unless you’re embroidering on a quilt (with batting and backing) you need to have stabilizer with the fabric.
One of the best suggestions we can make is to take a class at your local quilt shop, where you’ll learn from a person who has good experience with embroidery, and who can teach you some of the features of your embroidery machine.
If you know how to use your machine and just need to get started with Christine’s edge-to-edge quilting technique — we have a few suggestions:
- Class — many local quilt stores teach classes using the same teaching materials and approach that Christine uses when she teaches. It’s a great way to learn the technique and get more experience with the embroidery positioning feature on your machine.
- Video tutorials — you have two options here. First, Christine recorded a video walk-through of her technique, and posted it on our YouTube channel. It’s a great way to get a view of the basics. Second, if you want something more substantial, Annie’s Catalog offers a video class that Christine recorded. In that class, Christine uses a table runner to show the technique, but she talks about how the steps apply to a full size quilt.
- Whole cloth exercise — for your first attempt at the technique, get two 1-yard cuts of inexpensive fabric, and a 1-yard cut of batting. Make a quilt sandwich, using temporary spray adhesive or just a few quilting pins, leaving the center free of pins. Then, pretend that this is a quilt, and stitch 6 designs — 3 columns, with 2 designs in each column — following the instructions from the book. This will give you experience with all the steps of the technique. We suggest the whole cloth approach because, even though Christine put a lot of work into making the technique easy, it’s human nature to make a mistake or two when you’re learning something new. If you make a mistake on a whole cloth, it’s not a big deal. In contrast, if you make a mistake on a quilt top that you spent weeks piecing, it’s a lot more aggravating.
Can I use a magnetic hoop with your Edge-to-Edge Quilting Technique?
Absolutely! Magnetic hoops like the Snap Hoop Monster are great for edge-to-edge quilting using our techique. We plan to provide more information (and a video) soon, but following are the basics.
Use your standard hoop and templates for the first column of stitching. This ensures that you have the right spacing between the designs as you go down the quilt.
For every column after that, you can use your magnetic hoop. For the first design in a column, I would still pin a template in place, so that you can be sure that the design is more or less centered in the hoop. Check where the quilt falls in the hoop, relative to the rulers on the horizontal and vertical edges. If the quilt is not on an “easy” mark, shift the quilt by pulling on the quilt (or lifting a corner of the hoop and pulling), so that the start point of the design IS on a measurement mark that’s easy to find. Write down that location.
After you stitch each design, leave the hoop attached to the machine, lift the top part of the hoop, and just slide the quilt up so that you see the end point for the next design. Lay the top of the hoop back down, then pull the quilt so that the end point of the prior design is at the location (on the rulers) that you wrote down earlier.
Those are the basics!
Can I enlarge or reduce your Edge-to-Edge Quilting files?
The short answer, for all machines, is a qualified “yes.”
In the book, Christine originally recommended against resizing our files. However, after some further work, we’ve realized that if you need to resize our files, you can do it safely, as long as you follow a few simple rules.
First, if you resize, don’t change the size more than 10% of their original size. All embroidery software and most embroidery machines will allow you to resize files. But, in almost all cases, the stitches are not recalculated. That’s why you only want to reduce about 10% — if you do more than that, the stitches will get too small (or too large), and your machine will not work well.
Second, if you resize, you must reduce both the “A” and “B” files by the same amount. We also recommend that you save the resized files to your machine’s internal memory. That way, you don’t have to think about it any time you switch files. Consult your machine’s documentation or your local quilt store for instructions on how to save files. Once you’ve resized the files, the resized files through the entirety of the project — don’t just try to reduce the file dimensions at the edge of the quilt.
The slightly longer answer, for newer machines and some software, is also a qualified “yes,” but with some more options and caveats. Everything that I mention above about working with both files and saving them still applies. But, if you purchased your machine within the last few years, you may be able to resize more than 10%.
Some embroidery machine manufacturers — specifically Baby Lock and Brother — claim that with their newer machines, you can resize files and the machine WILL recalculate the stitches. Theoretically, that means that you should be able to resize files at will.
Some newer software — specifically the Embroidery Tool Shed software available from Designs in Machine Embroidery — also indicate that the software can resize designs and recalculate the stitch count. Embroidery Tool Shed is a free software package that allows you to purchase more functionality. The basic functions though — including resizing files — are available for free.
Whether you’re talking about newer machines or newer software, our answer remains the same, we have not had a chance to experiment with this. So, we still recommend that you only resize files +/- 10%, just to be sure. If you want to try resizing more, be sure to look at the stitch count before and after you resize. If the stitch count changes proportionally with the change to the dimensions, then you should be good.
If you play around with resizing and have some information you’re willing to share, please contact us at support@ameliescott.com and let us know what you learn.
I can load your files on my USB stick, but my embroidery machine cannot read it. Why?
There are two main causes for this problem: USB stick size, and hoop size.
Regarding USB memory sticks — Most embroidery machines require that you use a USB stick that has 2GB or less of storage. Most of the USB sticks you find in stores these days are much larger than 2GB, so check the size of your USB stick. When you put a “large” USB stick in an embroidery machine, you can get very odd results, anything from the machine not recognizing the designs, to the machine rebooting itself.
Regarding hoops — if you are able to load a design on a USB memory stick will work with your machine, but you don’t see the files listed on your embroidery machine when you select the USB stick, check the hoop size you have selected for your machine. If the dimensions of an embroidery design are substantially larger than the dimensions of the selected hoop (or the stitching field for your machine), then the machine will not display the file.
If you are working with our Edge-to-Edge quilting designs, remember that the files come in 3 dimensions. So, of the file you selected is too large for your hoop (most people tend to select the “large” files), try one of the smaller sizes.
Are quilting designs available for 5″ x 7″ hoops?
Yes and no…
The bad news — for the designs in our book, Edge-to-Edge Quilting on Your Embroidery Machine, I’m afraid not. There are a few reasons for this. First, we would need to completely rework every design for a 5×7 hoop, since it is not proportional to the other designs. Second, the smaller hoop size would make the quilting much more dense than it is with other hoop sizes. And third, with a smaller hoop, you would need to re-hoop the quilt many times to complete the quilting, and we are concerned that many customers would be unhappy with the results and process.
The good news — we have a few other products that provide quilting designs in a 5×7 size that you can use for quilting small projects:
- Celebrate Machine Embroidery — this book contains 12 different projects, all of which are designed to be stitched out in a 5×7 hoop. Included are 3 edge-to-edge quilting designs that are perfect for place mats and other small projects.
- Seasonal Swirl Place Mats — this pattern contains instructions and embroidery designs that help you turn a whole cloth into a set of 4 fully-quilted, seasonal themed place mats. The quilting designs can also be used on other projects.
These products are carried in quilt stores across the country, and are also available on our web store, so give them a try!
Will your designs work with my 5″ x 12″ hoop?
This is actually a tricky question. The short answer: it depends on your machine’s stitch field.
If the stitch field for your machine is 5×12 or larger, then you can use the hoop just fine.
If the stitch field for your machine is 5×7 (or any size smaller than 5×12), then you should be aware that this hoop uses a “multi-position” function. With a machine that has a roughly 5″ x 7″ stitching field, the hoop allows you to stop the machine, and shift the position of the hoop so that you can stitch out different sections of a larger design in one hooping. If you’re going to use the multi-position function, you will need to use computer software to “split” our files into 5×7 pieces that your machine can handle. (Sorry, but we do not split the files.) Consult your documentation or your local quilt store for information on how to split files.
If you’re ok with the file splitting, then here are some other things to note. You must use the small size files. As a reminder, all of our quilting files come in three sizes — small, medium, and large — the sizes are listed on the back of the book, and the specific size of each file is listed in the section starting on page 15 (the dimensions vary slightly from file to file). Some files will be OK “as is,” but you will need to reduce others slightly. In the book, we recommend against resizing files, but further experience has shown us that you can reduce files by about 10% and things will still work ok. Most embroidery machines will allow you to resize files somewhat. Consult your documentation or your local quilt store for information on how to do this.
I’m starting to stitch Column B, but the top of the stitching is too high. Why?
You’ve found one small issue that occurs with just a few of our early designs. In just about 5 designs (a few in the book, and 1 or 2 in Expansion Pack 1), the start point for the File B design is slightly above the vertical center of the stitching field.
This issue is confusing if you try to align the top of the stitching (or the template) for File B with the top of the stitching for File A — the B designs will be 1/4” too high, or maybe more. We have 2 easy solutions for this, and I’ll start with the most important one first.
Solution 1 — don’t focus on the top of the design. Instead, please review page 11 of our Edge-to-Edge book, where we show how to connect designs. If you focus on the start and end points of the designs, and connect them using Christine’s technique, the stitching will connect as you expect. The top of the stitching for each column of File B will be slightly higher than the top of the stitching for the columns of File A, but, all that really means is that the stitching for the B columns will go up into the binding at the top of the quilt. Everywhere else, the stitching will just look like beautiful, edge-to-edge quilting.
Solution 2 — get our updated files. Please use this link to contact our Customer Support. Tell us what file you’re using, and we’ll send you an updated set of files. But, please remember, the first solution is the most important; focus on the start and end points of the design, not the top edge.
Download and other file-related Questions
How do I register a serial number and get my files?
It’s very simple! Go to www.ameliescott.com/my-account, and then follow these 4 easy steps:
- Register (if you’re new to the site) or log in
- Click the Register a Product link, and type your serial number in the field.
- Click the Downloads link, then click the product link under the Downloads heading.
- Click the Account Details link, and finish setting up your account
It’s pretty easy. But, if you want detailed, step-by-step instructions with pictures, click the following link. You can view the document online, save, or print it.
How do I get files from DropBox?
Some of the links on our web site, and some of the downloads we send you for Customer Support use a cloud-based service called DropBox. When you click the link, you will see a web page that looks very similar to the following:
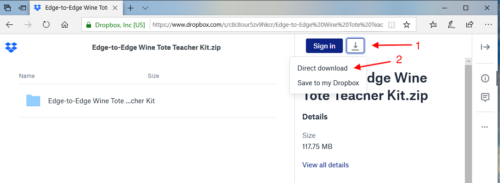
Don’t click on the folder icon that you see on the left side of the page. It will display the files that are in the ZIP file, but it won’t actually let you do anything with them. Instead, click the arrow “download” icon on the right side of the screen, then click the “Direct download” link. The files will download to your computer.
Can I purchase individual designs?
Sorry, but we don’t offer individual designs for sale. There are two reasons for that:
- The company that hosts our web store charges by the product. So, adding each design individually would involve a significant cost in terms of time and the changes for our web store.
- The majority of our sales comes from wholesale business with retailers, and we don’t want to undercut the many quilt stores that carry our products.
One other thought that might help: our book retails for $35, and each expansion pack is priced at $20. By comparison, the price of long-arm quilting for a lap or twin quilt is frequently $80-100. So, if you use one design one time, you have already saved a lot of money.
Why can’t I open your embroidery files on my computer?
The short answer: don’t try to open embroidery files on your computer. Just use the computer to copy the files you want to a USB memory stick so that you can load them on your embroidery machine. If you need help doing this, see the video tutorial I posted on our YouTube channel.
The longer answer: unless you’ve purchased or downloaded specialized (and often very expensive — like $3,000) embroidery digitizing and editing software, your computer can’t figure out how to open the files. What happens next depends on how your computer is set up… Much of the time, the computer will display a dialog that asks you what program you want to use. If that happens, then just cancel out of the dialog.
Even though your computer doesn’t know what to do with the embroidery files, it’s ok… your embroidery machine absolutely DOES know what to do with them! You should only use your computer to store embroidery files, or to move them to a USB memory stick.
Once you copy the files you want to a USB memory stick and load them in your embroidery machine, you will be all set. So, the bottom line: you should only use your computer to store embroidery files, and to move them to a USB memory stick.
Why does my computer put the Adobe Acrobat icon by your embroidery files?
The short answer: your computer is confused, but it’s ok.
The longer answer: unless you’ve purchased or downloaded specialized (and often very expensive — like $3,000) embroidery digitizing and editing software, your computer can’t figure out what program it should use to open the files. It then tries to make an educated guess, and it thinks that Adobe Acrobat will be able to open the files. And, as you’ve figured out by now… that’s a valiant effort on the part of your computer, but wrong. See? You’re smarter than your computer!
The good news is that nothing bad has happened to the embroidery files. And even though your computer is confused about what to do with the embroidery files, your embroidery machine absolutely DOES know how to use them!
Once you copy the files you want to a USB memory stick and load them in your embroidery machine, you will be all set. So, bottom line: you should only use your computer to store embroidery files, and to move them to a USB memory stick.
If you need help with moving files to a USB memory stick, I have a video on the Amelie Scott YouTube Channel that can help. Use this link to view it.
The next thing you might wonder is “how do I get rid of these Adobe Acrobat icons?” That’s a good question, but there’s not an easy answer to that. You would need to associate the files with a different program, and again, unless you want to purchase or download reasonably complicated software that you don’t really plan to use, you don’t really have a good program to select. I suggest that you ignore the icons, and know that your files are ok.
Whew! That was a longer answer than I expected… I hope it helps!
eBook Questions
How do I load the eBook on my computer or tablet?
Installing the book is about as easy as clicking a link on a web site. But, just to be helpful, following are links to video tutorials that walk you through the process:
For Microsoft devices: If you plan to read the eBook from a Microsoft Surface or standard computer, use the following instructions (I plan to post a video soon).
For a Windows device of any kind, you will need an eBook reader that supports ePUB format to use the eBook. Luckily, several are available from the Microsoft Store, and several of them are free. Freda is a decent product, and while the interface was a little different from other eBook readers I’ve used, it was easy to get started. Of course, you are welcome to try any eBook reader you want.
To get one, click on the Start button, and select the Microsoft Store icon. If you don’t see the icon when you click the Start button, you can just start typing Microsoft store, and it will show up. Then, you can search for an ePUB reader or eBook reader, and install one.
Once you’ve done that, you should be able to open and use the eBook.
How to I use an eBook?
If you’ve never used an eBook before, see the video at this link for an overview.
Janome Questions
Why can’t I see the Mug Rug designs on my Janome machine?
Our Mug Rugs require a 5.5″ x 8″ stitching field. Janome sells an 8″ hoop, but in reality, the hoop has a 7.9″stitching field. We have recently re-sized all our Mug Rug designs to work with a 7.9″ stitching field. Check your CD, and if it does not have a “revised” date at the bottom, please contact us, and we will send you a link to download a new set of files.
Why does my software say “file defective” when I try to transfer it to my Janome machine?
Ah, yes… this answer is brought to you by the letter “G,” as in… “Gee, what a misleading error message!” What this error message REALLY means is: “the file is too large to fit into your hoop.” If you are using one of our Edge-to-Edge Quilting designs, either select a larger hoop, or choose a smaller design size.
I have copied your embroidery files to my USB stick; why don’t they show up on my embroidery machine?
If the designs are larger than the selected hoop, the machine will often not show the files. If you are using our edge-to-edge embroidery files, choose a smaller file size. Otherwise, you will need a larger hoop.
Also, make sure that your USB stick has been formatted by the Janome machine. Embroidery files must be in a specific folder on the USB stick for a Janome machine to find/recognize them. Consult your Janome documentation.
Can I use the edge-to-edge quilting files on my Janome Memory Craft 11000?
The answer is a “qualified” yes… Our files will only fit on the Macro hoop. Be aware that this hoop is used with a multi-position function on the 11000, where you shift the position of the hoop for different parts of the design. If you’re going to use the multi-position function, you will need to use software from Janome to “split” our files. (We do not split the files.)
If you’re ok with the file splitting, then here are some other things to note. Our designs will work with a Janome 1100, although you must use either the small or medium size files. As a reminder, all of our quilting files come in three sizes — small, medium, and large — the sizes are listed on the back of the book, and the specific size of each file is listed in the section starting on page 15 (the dimensions vary slightly from file to file). If you have the Janome Macro hoop, then you have a 7.8″ x 11” stitching field. This hoop size will be more than large enough for the small files, which have a 5.6” x 9.9” maximum size.
If you want to “cover more ground” with each hooping, the medium files are close to the right size, with 6.7” x 11.7” being the maximum dimensions of any medium file. Obviously, the width is fine, but the length is just a little too long. Most machines will allow you to reduce the dimensions of a file somewhat. Our experience is that you can reduce one of our quilting files by about 10% and still have everything work ok.
For information regarding how to use the multi-position function of the Macro hoop, or how to reduce the dimensions of a file, consult your Janome documentation, or talk with a Janome expert at your local quilt store.
Brother / Baby Lock Questions
I can see the PES files on the jump drive… why doesn’t my machine read them?
It may be that our files use a more current version of PES than your machine. PES is the only embroidery file format that changes substantially between versions of the design software. So, if your machine is set to read PES version 4 files, it won’t be able to read PES version 7 files.
If you’re using our Edge-to-Edge products, early products provided PES v9 and PES v7 files. After that, all of our files are provided in PES v6 format. So, if your machine isn’t reading the PES V9 files, try the v7 files.
Otherwise, check in with your local dealer to have the firmware on your machine upgraded. For future reference… the current version is PES v10.
Why are strange things happening with your files on my Baby Lock Destiny?
Two firmware updates are available for the Destiny, and they must be applied in the correct order. These updates correct a variety of issues that can cause really strange behavior, like files loading sideways and files stitching out backwards. Contact your local Baby Lock dealer for assistance with updating your machine.
Why do your edge-to-edge quilting files start in the middle of the hoop?
Our files actually start on the left side of the design. However, Baby Lock machines always override my designs, and start files in the middle of the hoop.
The good news is that there’s an easy fix: Baby Lock machines have a simple command that lets you set the start point. Click this link to download a 1 page PDF file from our DropBox account that shows you how to move the needle to the correct position, in the middle-left side of the hoop.
Why does the needle jump up on some edge-to-edge designs, even after I’ve set the start point?
On some of our designs — particularly early designs — the first stitch of the design was slightly (or sometimes more than slightly) above the vertical center of the stitch field. For designs where we centered the first stitch correctly, setting the start point on your Brother or Baby Lock machine is all you need. But, for the designs where we were somewhat above center, the needle will jump.
We have corrected this issue on all designs. If you want an updated set of files, please use our CONTACT US page to request the update.
BERNINA Questions
Why are the eXtreme size files from the Jumbo Pack not available in EXP format?
You’re particularly wondering that if you have a nice, rectangular, magnetic hoop. The problem is that, even though the rectangular hoop is large enough fit the eXtreme size files, the stitch field on BERNINA machines is also oval. That’s right… it’s not just the hoop. So, even though the rectangular magnetic hoop will fit in your machine, the machine won’t take advantage of the extra space.
That’s the bad news. The good news is that the Jumbo Pack also contains the Large size files that will work just fine with your BERNINA.
Why are the edge-to-edge embroidery large files not available in ART format?
When we first published our book, BERNINA did not have hoops large enough for the large files. Shortly thereafter, BERNINA made larger hoops available for BERNINA machines. However, the recommended file format for large hoop BERNINA machines is the EXP format, so we only published ART format for the smaller hoop sizes.
When BERNINA released machines that had hoops big enough to hold our Large files, we started publishing ART files in that size. Earlier expansion packs still may not have ART files.
So, if your CD or download does not include Large size files in ART format, please use the EXP files.
Elna Questions
Can I use your edge-to-edge files on my Elna 9600?
The answer is a “qualified” yes… Our files will only fit on the Macro hoop. Be aware that this hoop is used with a multi-position function on the 9600, where you shift the position of the hoop for different parts of the design. If you’re going to use the multi-position function, you will need to use software to “split” our files. (We do not split the files.)
If you’re ok with the file splitting, then here are some other things to note. Our designs should work fine with an Elna 9600, although you must use either the small or medium size files. As a reminder, all of our quilting files come in three sizes: mall, medium, and large. The sizes are listed on the back of the book, and the specific size of each file is listed in the section starting on page 15 (the dimensions vary slightly from file to file). If you have the Elna Macro hoop, then you have a stitching field that is 7.8 x 11 inches. This hoop size will be more than large enough for the small files, which have a maximum size of 5.6 x 9.9 inches.
If you want to cover more area with each hooping, the medium files are close to the right size, with 6.7 x 11.7 inches being the maximum dimensions of any medium file. Obviously, the width is fine, but the length is just a little too long. Most machines will allow you to reduce the dimensions of a file somewhat. Our experience is that you can reduce one of our quilting files by about 10% and still have everything work ok.
For information regarding how to use the multi-position function of the Macro hoop, or how to reduce the dimensions of a file, consult your Elna documentation, or talk with an Elna expert at your local quilt store.
Privacy
It’s really simple… we won’t sell your contact information or use it for anything other than a sporadic update about new products.
Other Questions
If your question is not answered here, please use the Contact page to ask your question. Please provide as much detail as you can about the issue. We will respond within 48 hours.